
Cerita ini dimulai ketikan penulis menggunakan aplikasi scanner gratisan yang saat ini banyak digunakan untuk platform android yaitu CamScanner, dengan beberapa fitur dasar seperti detect skewing. Dasar operasi ini yaitu transalasi dan affine. Bila sedang menangani sebuah project yang berkenaan dengan scanner document maka pastikan algoritma ini ada dalam core engine kalian. Hal menarik adalah kita hanya menggunakan 3 package/library yaitu opencv, imutils, serta scikit-image. Yuk kita bahas satu-persatu saja
Skewing
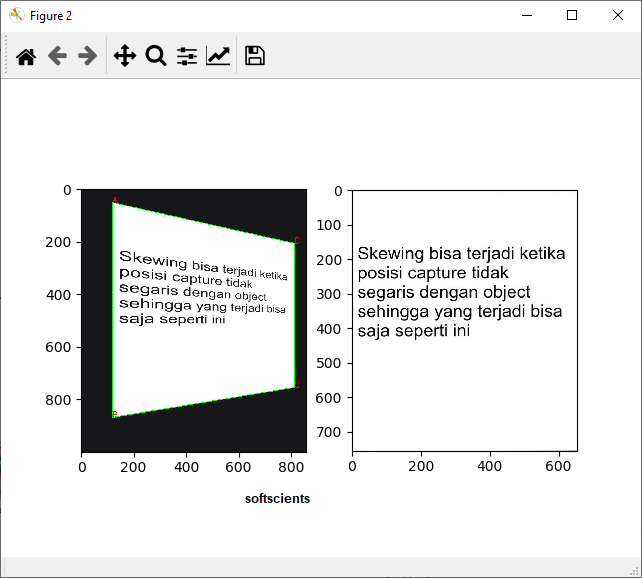
Skewing bisa terjadi ketika posisi capture tidak segaris dengan object sehingga yang terjadi bisa saja seperti ini
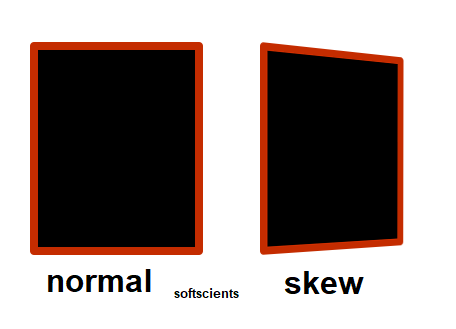
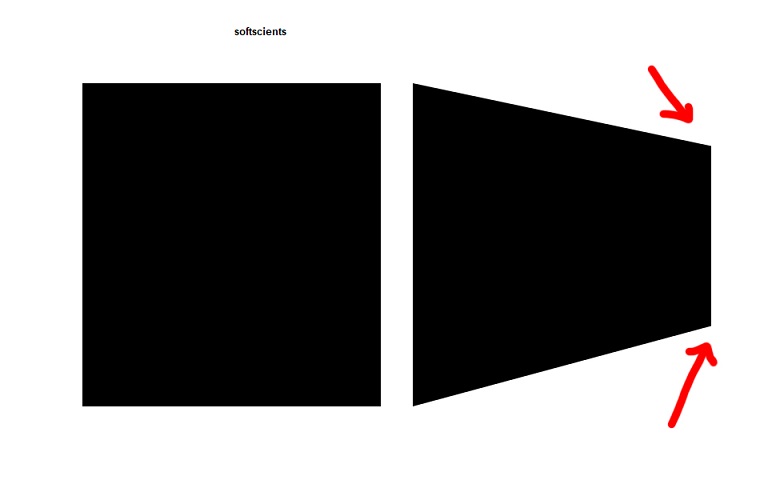
Bila aplikasinya bisa deteksi skew dan melakukan deskewing maka hal ini akan semakin menarik karena aplikasi yang kita buat menjadi lebih pintar. Kalian bisa melihat yang semula object berbentuk rectangle menjadi sebuah prism
Find Contour
Dasar algoritma ini bekerja dengan operasi find Contour sering disebut dengan blob operation (kalau kalian menggunakan Matlab) yang bertujuan diantaranya
- menemukan objek,
- letak koordinat,
- convex hull,
- size
kalian bisa baca link berikut agar paham (harap harus dibedakan mengenai retrieval mode nya ya karena sangat berpengaruh jika didalam objek tersebut ada objek lagi/inner object)
- https://softscients.com/2020/03/30/buku-pengolahan-citra-digital-dengan-python-dan-opencv-contour-retrieval-mode-find-contour/
- https://softscients.com/2020/03/30/buku-pengolahan-citra-digital-dengan-python-dan-opencv-merging-binary-object/
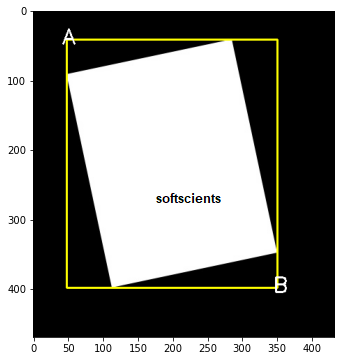
Find Contour bekerja pada image binary sehingga kalian harus memastikan bahwa operasi segmentasi dapat bekerja dengan baik, nah agar fokus ke pembahasan ini, kita gunakan sebuah image yang clear/bebas dari noise dengan 1 objek.

Dengan hasil informasi mengenai posisi A (x,y) dan B (x+width, y+height) seperti berikut:
import numpy as np
import cv2
from matplotlib import pyplot as plt

font = cv2.FONT_HERSHEY_SIMPLEX
url = 'gambar.jpg'
image = cv2.imread(url,1)
image2 = image.copy()
gray = cv2.cvtColor(image, cv2.COLOR_BGR2GRAY)
edged = cv2.Canny(gray, 10, 50)
cnts,hierarcy = cv2.findContours(edged.copy(),cv2.RETR_EXTERNAL,cv2.CHAIN_APPROX_SIMPLE)
for cnt in cnts:
    [x,y,w,h] = cv2.boundingRect(cnt)
    if w > 10 and h>10:
        cv2.rectangle(image2,(x,y),(x+w,y+h),(255,255,0),2)
        cv2.putText(image2,'A',(y,x), font,1,(255,255,255),2)
        cv2.putText(image2,'B',(y+w,x+h), font,1,(255,255,255),2)

plt.close('all')
plt.imshow(image2,cmap='gray')
plt.show()
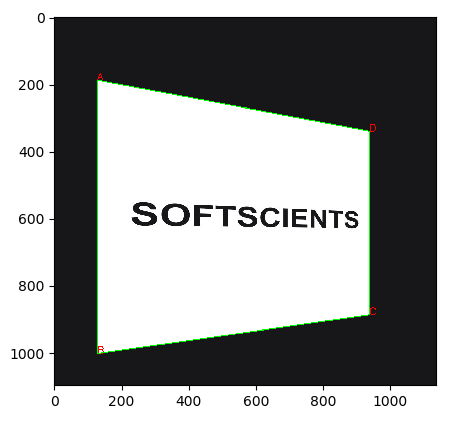
Nah seharusnya kita mendeteksi ke 4 corner sebagai berikut

Untuk mendapatkan tiap corner diatas, opencv sudah dilengkapi dengan perintah arcLength() dan approxPlotyDP() sebagai berikut
peri = cv2.arcLength(cnt, True)
approx = cv2.approxPolyDP(cnt, 0.02 * peri, True)
Lebih lengkapnya
letak=['A','B','C','D']
screenCnt = None
for cnt in cnts:
    peri = cv2.arcLength(cnt, True)
    approx = cv2.approxPolyDP(cnt, 0.02 * peri, True)
    if len(approx) == 4:
        screenCnt = approx
        index = 0
        for app in approx:
            #print(app)
            x = app[0][0]
            y = app[0][1]
            cv2.putText(image2,letak[index],(x,y), font,1,(255,0,0),2)
            index = index+1
        break

cv2.drawContours(image2, [screenCnt], -1, (0, 255, 0), 2)
plt.close('all')
plt.imshow(image2,cmap='gray')
plt.show()
Contoh gambar yang lainnya yaitu untuk menentukan corner image
Perbaikan Skew gambar untuk Akurasi Mesin Scanner
Setelah didapatkan titik A, B, C, dan D maka akan dihitung dan dilakukan affine
Algoritma ini kami temukan di pyimagesearch.com, nah kalian bisa menggunakan kode dibawah ini
import numpy as np
import cv2
import imutils
from skimage import exposure
from matplotlib import pyplot as plt


image = cv2.imread('gambar 7.jpg')

font = cv2.FONT_HERSHEY_SIMPLEX
pembagi = 1000

ratio = image.shape[0] / pembagi
orig = image.copy()
image = imutils.resize(image, height = pembagi)
image2 = image.copy()
# convert the image to grayscale, blur it, and find edges
# in the image
gray = cv2.cvtColor(image, cv2.COLOR_BGR2GRAY)
gray = cv2.bilateralFilter(gray, 11, 17, 17)
edged = cv2.Canny(gray, 30, 200)


cnts,hierarcy = cv2.findContours(edged.copy(),cv2.RETR_EXTERNAL, cv2.CHAIN_APPROX_SIMPLE)


#untuk menggambar sebuah posisi masing-masing sudut
letak=['A','B','C','D']
screenCnt = None
for cnt in cnts:
    peri = cv2.arcLength(cnt, True)
    approx = cv2.approxPolyDP(cnt, 0.015 * peri, True)
    #approx = cv2.approxPolyDP(cnt, 0.02 * peri, True)
    if len(approx) == 4: #pastikan bahwa sudut tersebut punya 4 sudut
        screenCnt = approx
        index = 0
        for app in approx:
            #print(app)
            x = app[0][0]
            y = app[0][1]
            cv2.putText(image2,letak[index],(x,y), font,1,(255,0,0),2)
            index = index+1
        break

cv2.drawContours(image2, [screenCnt], -1, (0, 255, 0), 2)
plt.close('all')
plt.figure(),plt.imshow(image2,cmap='gray'), plt.show()


# now that we have our screen contour, we need to determine
# the top-left, top-right, bottom-right, and bottom-left
# points so that we can later warp the image -- we'll start
# by reshaping our contour to be our finals and initializing
# our output rectangle in top-left, top-right, bottom-right,
# and bottom-left order
pts = screenCnt.reshape(4, 2)
rect = np.zeros((4, 2), dtype = "float32")

# the top-left point has the smallest sum whereas the
# bottom-right has the largest sum
s = pts.sum(axis = 1)
rect[0] = pts[np.argmin(s)]
rect[2] = pts[np.argmax(s)]

# compute the difference between the points -- the top-right
# will have the minumum difference and the bottom-left will
# have the maximum difference
diff = np.diff(pts, axis = 1)
rect[1] = pts[np.argmin(diff)]
rect[3] = pts[np.argmax(diff)]

# multiply the rectangle by the original ratio
rect *= ratio

# now that we have our rectangle of points, let's compute
# the width of our new image
(tl, tr, br, bl) = rect
widthA = np.sqrt(((br[0] - bl[0]) ** 2) + ((br[1] - bl[1]) ** 2))
widthB = np.sqrt(((tr[0] - tl[0]) ** 2) + ((tr[1] - tl[1]) ** 2))

# ...and now for the height of our new image
heightA = np.sqrt(((tr[0] - br[0]) ** 2) + ((tr[1] - br[1]) ** 2))
heightB = np.sqrt(((tl[0] - bl[0]) ** 2) + ((tl[1] - bl[1]) ** 2))

# take the maximum of the width and height values to reach
# our final dimensions
maxWidth = max(int(widthA), int(widthB))
maxHeight = max(int(heightA), int(heightB))

# construct our destination points which will be used to
# map the screen to a top-down, "birds eye" view
dst = np.array([
   [0, 0],
   [maxWidth - 1, 0],
   [maxWidth - 1, maxHeight - 1],
   [0, maxHeight - 1]], dtype = "float32")

# calculate the perspective transform matrix and warp
# the perspective to grab the screen
M = cv2.getPerspectiveTransform(rect, dst)
warp = cv2.warpPerspective(orig, M, (maxWidth, maxHeight))

# convert the warped image to grayscale and then adjust
# the intensity of the pixels to have minimum and maximum
# values of 0 and 255, respectively
warp = cv2.cvtColor(warp, cv2.COLOR_BGR2GRAY)
warp = exposure.rescale_intensity(warp, out_range = (0, 255))


plt.figure()
plt.subplot(1,2,1),plt.imshow(image2,cmap='gray')
plt.subplot(1,2,2),plt.imshow(warp,cmap='gray'), plt.show()